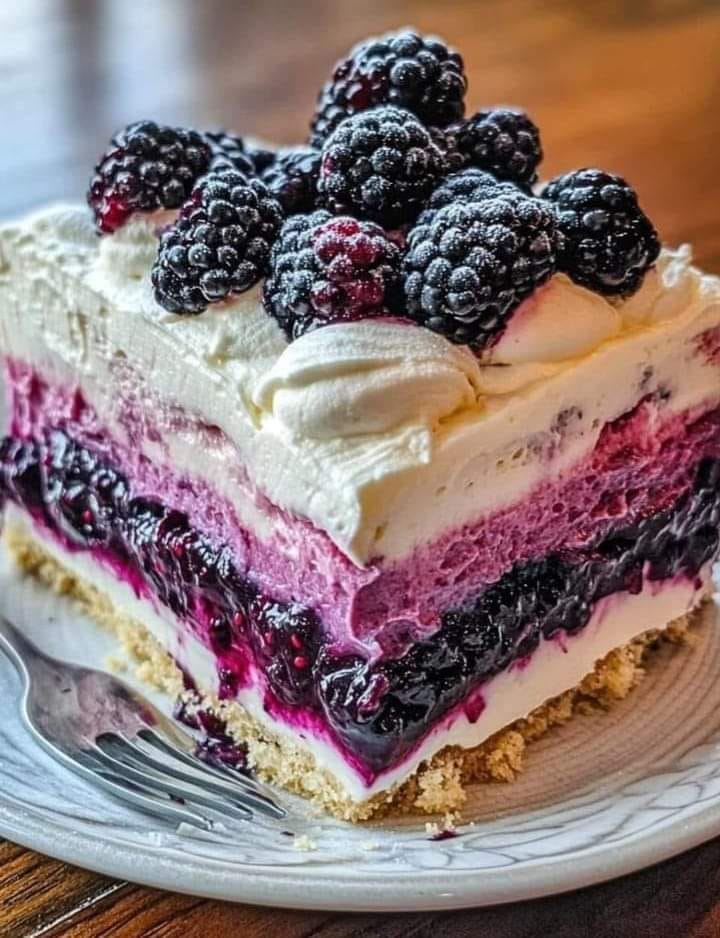
Refreshing No-Bake Blackberry Layer Cake – A Creamy and Fruity Delight
Introduction
Indulge in the refreshing flavors of this No-Bake Blackberry Layer Cake! With a buttery cookie crust, luscious cream cheese filling, a fruity blackberry layer, and a light whipped mousse, this cake is a perfect dessert for any occasion. It’s easy to make, requires no oven, and is guaranteed to impress your family and friends. Let’s get started!
Ingredients
For the Cookie Crust:
- 2 cups (200g) graham cracker crumbs or digestive biscuits
- ½ cup (115g) unsalted butter, melted
For the Cream Cheese Filling:
- 2 cups (450g) cream cheese, softened
- ½ cup (100g) granulated sugar
- 1 tsp vanilla extract
- 1 cup (240ml) heavy whipping cream, whipped to stiff peaks
For the Blackberry Layer:
- 2 ½ cups (375g) fresh or frozen blackberries
- ½ cup (100g) granulated sugar
- 1 tbsp lemon juice
- 2 tbsp cornstarch mixed with 2 tbsp water
For the Blackberry Mousse:
- 1 cup (240ml) cooled blackberry sauce (from the blackberry layer)
- 1 cup (240ml) heavy whipping cream, whipped to stiff peaks
- 2 tbsp powdered sugar
For the Topping:
- 1 cup (240ml) whipped cream
- Fresh blackberries
- Lemon zest or powdered sugar for garnish

Instructions
Step 1: Make the Crust
- Combine the graham cracker crumbs and melted butter in a mixing bowl. Mix until the crumbs are evenly coated.
- Press the mixture firmly into the bottom of a 9-inch (23cm) springform pan to form an even layer.
- Chill the crust in the refrigerator for 30 minutes to set.
Step 2: Prepare the Cream Cheese Filling
- Beat the cream cheese, granulated sugar, and vanilla extract in a bowl until smooth and creamy.
- Gently fold in the whipped cream until well incorporated.
- Spread the cream cheese filling over the chilled crust and refrigerate while preparing the blackberry layer.
Step 3: Make the Blackberry Layer
- In a saucepan, combine the blackberries, sugar, and lemon juice. Cook over medium heat, stirring occasionally, until the berries soften and release their juices, about 5–7 minutes.
- Stir in the cornstarch slurry and cook for another 2–3 minutes until thickened.
- Remove from heat and let cool to room temperature. Reserve 1 cup of the sauce for the mousse layer.
Step 4: Prepare the Blackberry Mousse
- Gently fold the reserved blackberry sauce into the whipped cream. Add powdered sugar and mix until light and fluffy.
- Spread the mousse evenly over the cream cheese layer.
Step 5: Assemble the Cake
- Spread the remaining blackberry sauce over the mousse layer for a vibrant finish.
- Add a final layer of whipped cream on top, smoothing it out with a spatula.
Step 6: Garnish and Serve
- Decorate the top of the cake with fresh blackberries, a sprinkle of powdered sugar, or a touch of lemon zest for an extra burst of flavor.
- Chill the cake for at least 4–6 hours or overnight to ensure the layers set properly.
- Slice and serve cold for a refreshing and creamy dessert.
Pro Tips
- Use fresh blackberries for the best flavor, but frozen ones work well too—just ensure they’re fully thawed and drained.
- Chill each layer for 10–15 minutes before adding the next to create clean, distinct layers.
- For a tangier mousse, add an extra teaspoon of lemon juice to the blackberry sauce.
Serving Suggestions
- Serve this cake as a refreshing summer dessert alongside iced tea or lemonade.
- Add a drizzle of chocolate or caramel sauce for an indulgent twist.
- Pair it with fresh berries on the side for added texture and flavor.
Conclusion
This Refreshing No-Bake Blackberry Layer Cake combines the tartness of blackberries with creamy layers for a perfectly balanced dessert. Whether it’s for a family dinner, a celebration, or simply to satisfy your sweet tooth, this cake will become your go-to recipe. Try it today and impress your loved ones with this elegant treat.
Happy no-baking!